First Garden
Since moving into my house in the spring of 2007, I've been wanting to have a garden. It's been a long time coming because of other issues that had to be dealt with first. I did till a small plot within my backyard fence for some herbs, and to hold some hostsa for my flowerbeds while foundation work was being done to my house. The problem with that plot was not a lot of sunlight because of the tall oak trees I have in my backyard. Luckily enough my back fence is inset off the back lane by about 10 feet, so I have ample room back there for a bit of a garden.
The back lane is to the south of my house and gets a lot of sunlight, so it's perfect for a garden. I had already set up two composters back there. So they're nice and close for getting compost, and for throwing garden waste into. The area is full of gravel from a parking space for a trailer (that's why the fence was moved up apparently), and any Winnipeger who has tried to garden knows what it's like to deal with the clay that we have in our soil. For that reason I decided to do a raised bed garden. The other advantage of a raised bed garden is water management. Raised bed gardens also drain well so your garden doesn't get flooded as easily. With the amount of rain that we've had fall this year, this proved to be a wise decision.
The Build
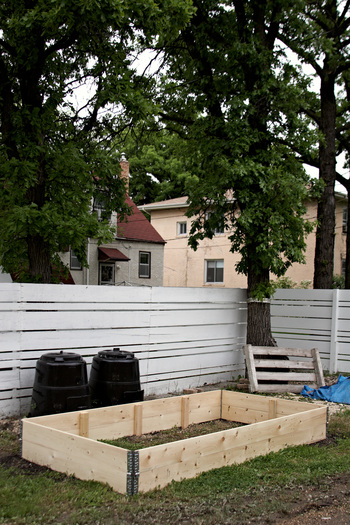
Last summer I built raised beds in front and behind my house for flower beds with 4x4 cedar. That was a tad pricey, and I wanted to keep this garden cheaper than that. I found some great brackets from Lee Valley tools for crate building that they recommend for building quick raised beds. I picked up a few sets, and some 1x8 lumber from the lumber store close to my house. This is what I came up with:

The dimensions of it is 5 feet by 10 feet and 16 inches high. I strapped the two layers on the inside with some 2x4s and dug them down about 8 inches into the ground to prevent excessive bowing when it's full of soil. You can also see the close proximity of my composters, which should make them quite convenient.
Once I was done the build I ordered myself 5 yards of three-way mix (compost, sand, and peat). I didn't want any soil in it as it tends to be quite heavy with clay in this part of the provence. The dump truck driver was able to dump the soil right into the box, and I just had to rake it out flat. The box only needed around 3 yards of soil, and the rest I spread on the grass in my back yard.
This actually turned out to be a cheaper and faster project than I expected. All in all I needed:
- $30 for two sets of crate brackets
- $70 for eight ten foot 1x8s
- $130 for 5 yards of soil (note only 3 yards for the box)
- 8 hours of time to build and fill the box with soil
The Finished Product
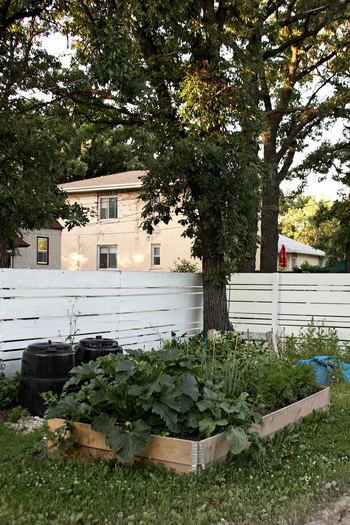
Of course, as it always does, the rain started right when I got my soil delivered. I managed to get it leveled out in my box, and some of it moved into the back yard before too much fell. The summer of 2010 has proven to be a rainy year, which is good and bad. It meant I had a tarped pile of dirt in my back lane for longer than I wanted. However it also meant that once we got the garden planted, I haven't had to water it once. This is how things are looking as of last night:

We have a few types of peppers, tomatoes, beans, peas, carrots, zucchini, cucumbers, turnip, and squash planted in there. In fact, I think it's planted a little too dense, but lesson learned for next year.
Issues
There are a few issues with this garden, so I thought I'd mention them if you're wanting to do something similar.
The ten foot long sides bowed more than I expected once it was filled with soil. In retrospect I should have put in a cross brace at the top of the garden in the middle of the ten foot long runs. I could have also used 2x8 lumber, but that would have required chamfering the lumber on the ends. The other option was to build two 5x5 beds instead of one giant 5x10 bed. Next spring I think I'll put in a cross brace to try and prevent the bowing from getting worse.
I had an issue with all the peat floating to the top of the soil and forming a crust on top. I've broken it up a couple times this year and turned it back into the soil. Next time I'd do a little more reading to figure out what I should fill the beds with. It's been a couple of months now, but it seems like the peat is finally broken down enough that it's not floating to the top in the same manner. I believe that my neighbour uses a compost sand mix with no peat in her beds and gets good results.
The tomatoes, zucchini and cucumbers are HUGE, and are overwhelming the other plants in the garden. Next year those plants will go into their own containers separate from this bed. That would mean we would have room for more beans, peas, peppers, and carrots.
0 TrackBacks
Listed below are links to blogs that reference this entry: First Garden.
TrackBack URL for this entry: http://aacmckay.org/cgi-bin/mt-tb.cgi/14

Hey Andrew,
I found that with my Zucchini and cucumbers that I planeted in my raised bed(with trial and error), that planting them in a corner of the plot and training them to expand onto the actual ground leaves a lot more room in the bed for the other plants. Just an idea :)
Thanks for the advice Layce. I did plant them to the sides, but we haven't been paying that much attention to the garden, and it exploded once it got a bit of sun after all that rain. We'll see if we can reign some of the larger plants in a bit.
Thank you for the valuble information on tomatoes. Ive been having problems with them for years.